Set up Google Consent Mode V2
Hello there! This guide walks you through connecting Google Consent Mode V2 to Avada Cookie Consent.
Google Consent Mode V2 lets your Google tags (Google Analytics, Google Ads, Google Tag Manager) adjust how they behave based on each visitor's consent choice. When a visitor has not consented to Analytics or Marketing cookies, Google tags run in a restricted mode and do not store cookies for those purposes.
Google Consent Mode V2 is available on the Pro plan and above.
Prerequisites
- Your cookie banner is active on your storefront.
- You use an Online Store 2.0 theme, so you can turn on app embeds in the theme editor.
Open the Google Consent Mode V2 integration
In the Avada Cookie Consent app, go to Integrations and click Google Consent Mode V2.
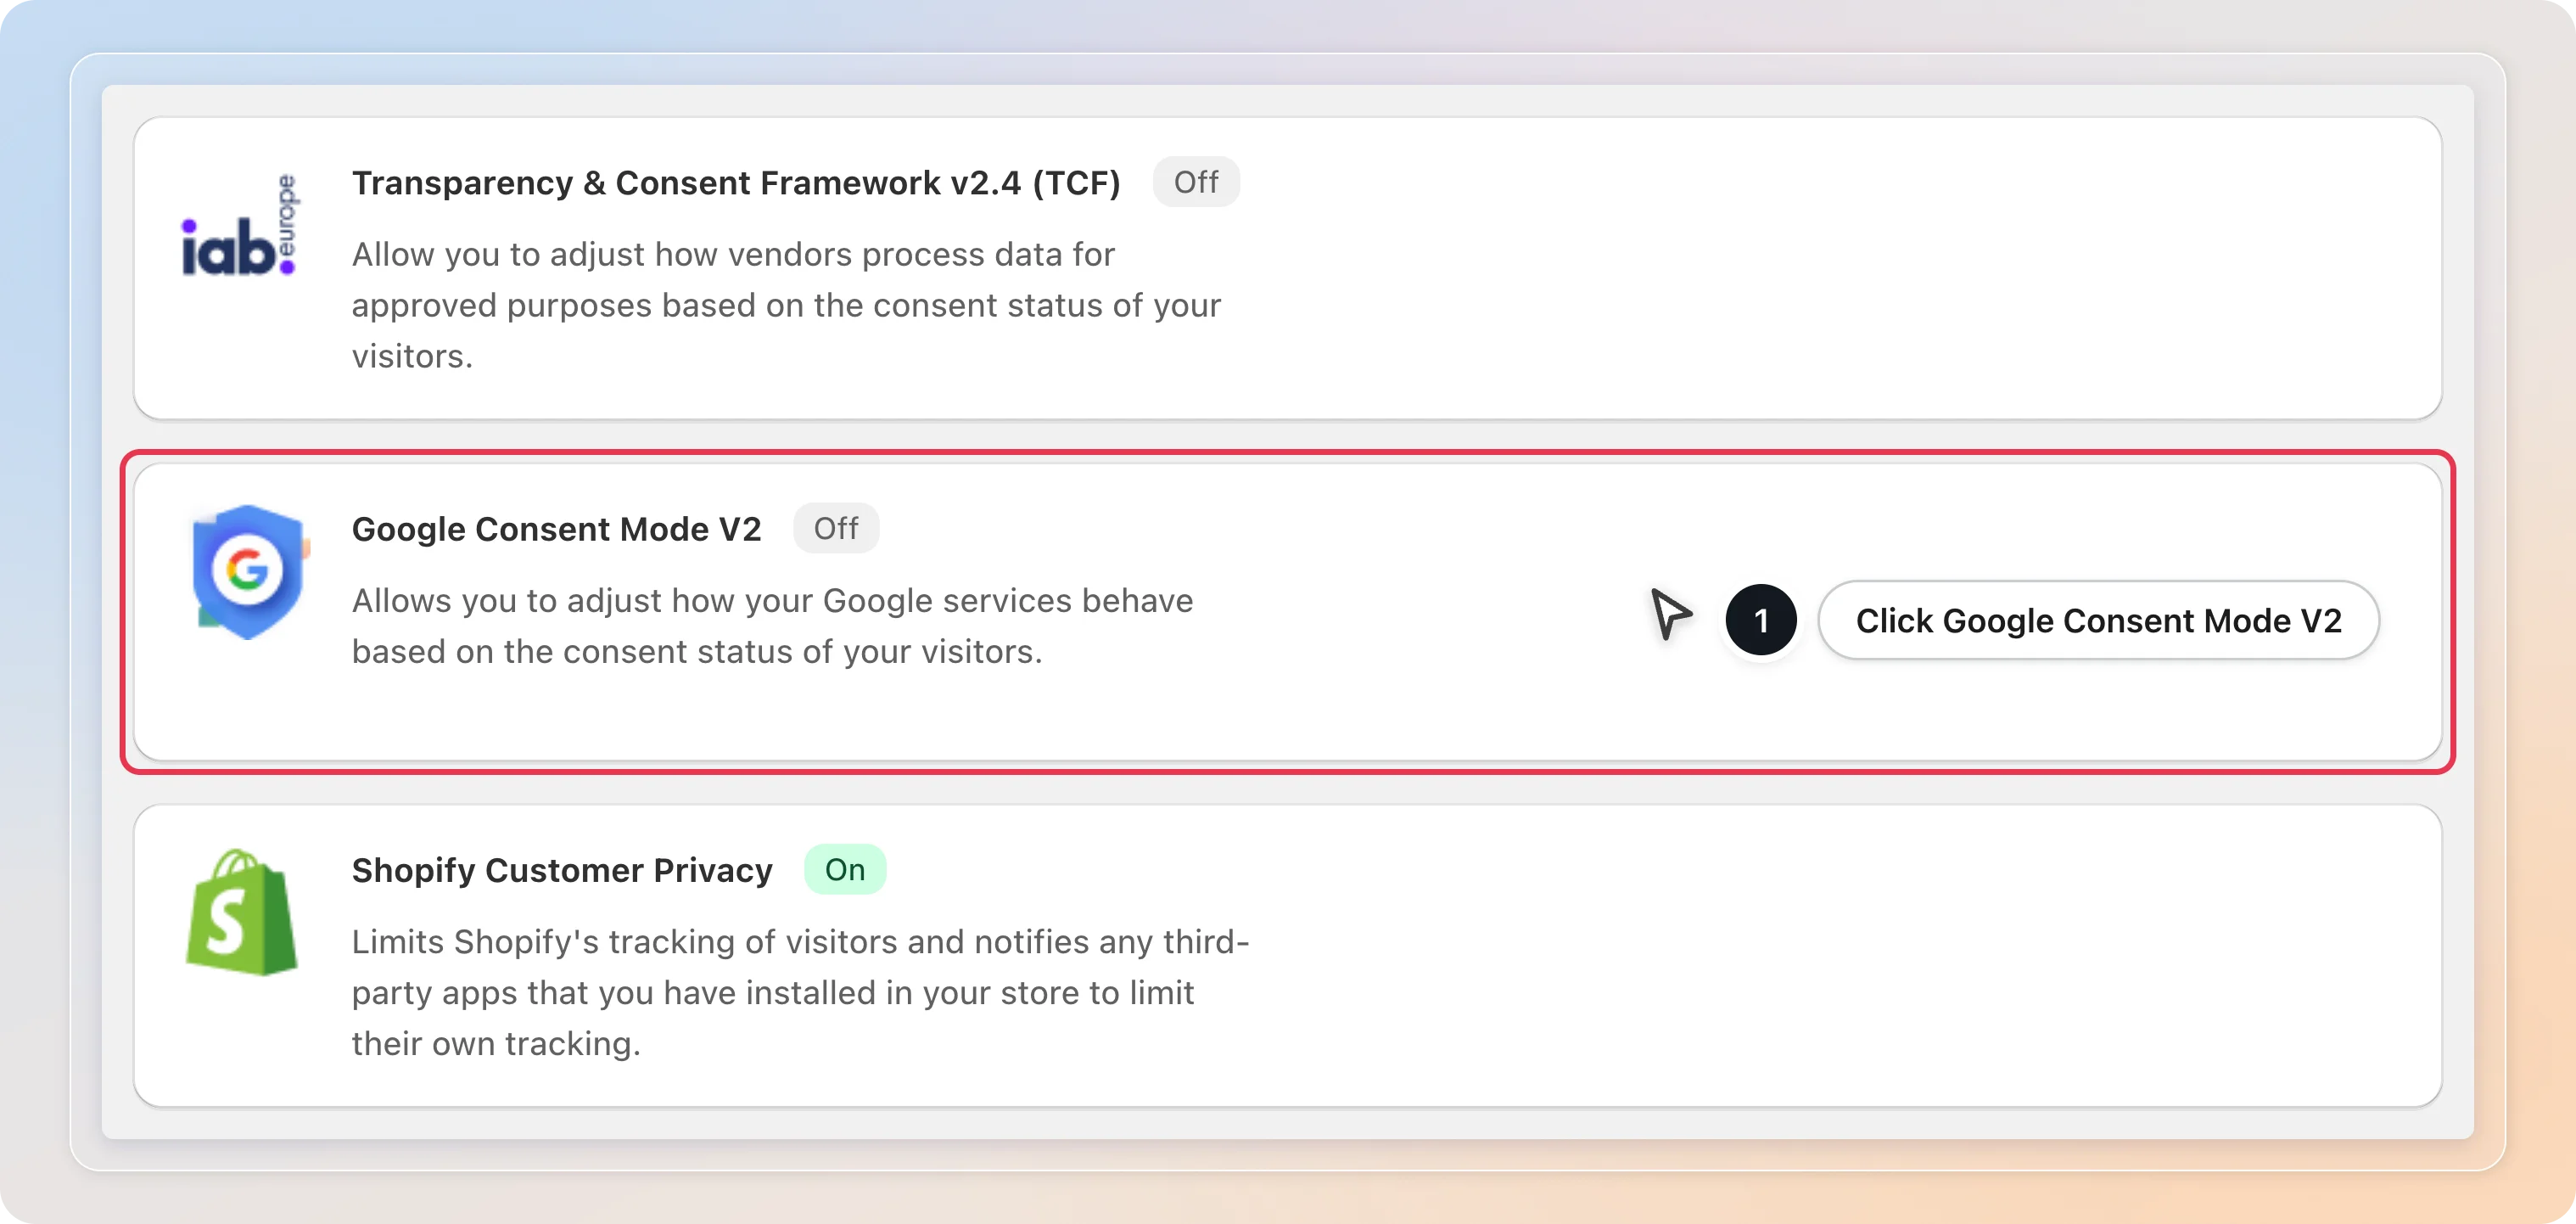
Turn on the Google Consent Mode app embed
This is the recommended first step. The app embed sends Google the default consent state before any Google tag loads.
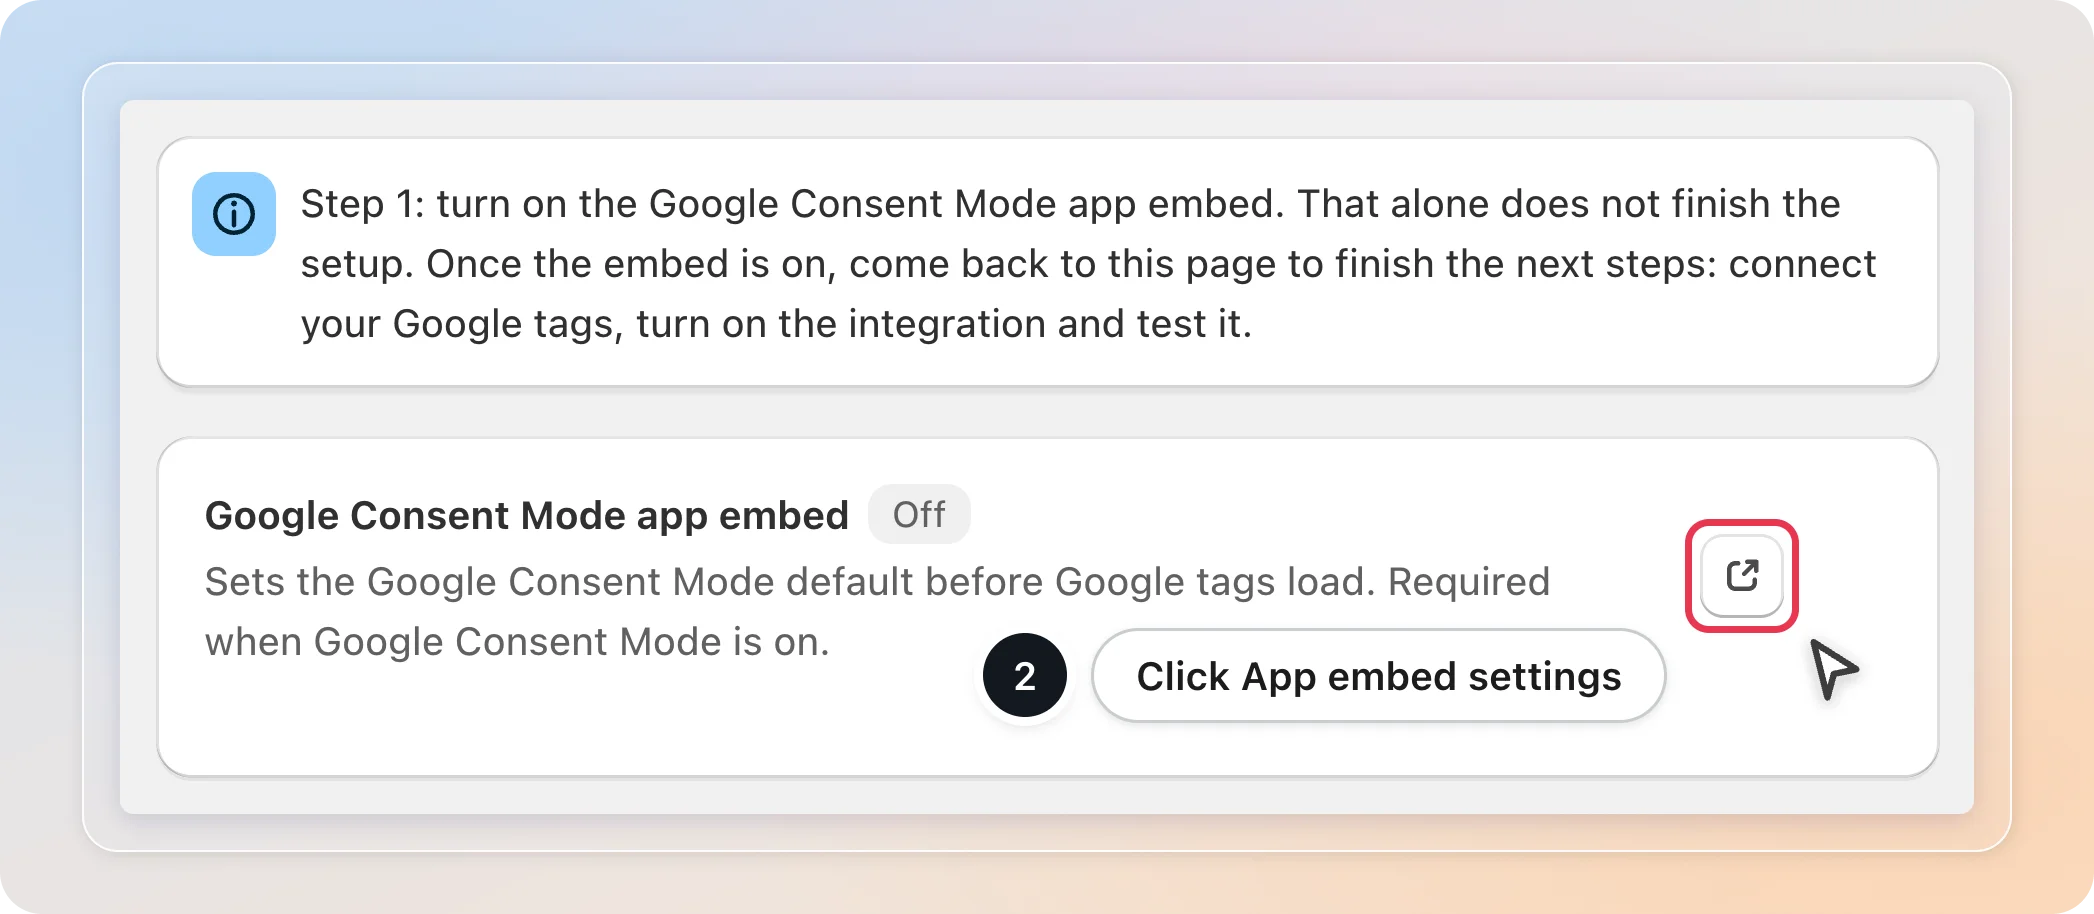
When the embed is off, the page shows the Google Consent Mode app embed row with an Off badge.
- Click the App embed settings button (the external link icon) on that row. The theme editor opens on App embeds.
- Make sure Avada Google Consent Mode is switched on.
- Click Save in the theme editor.
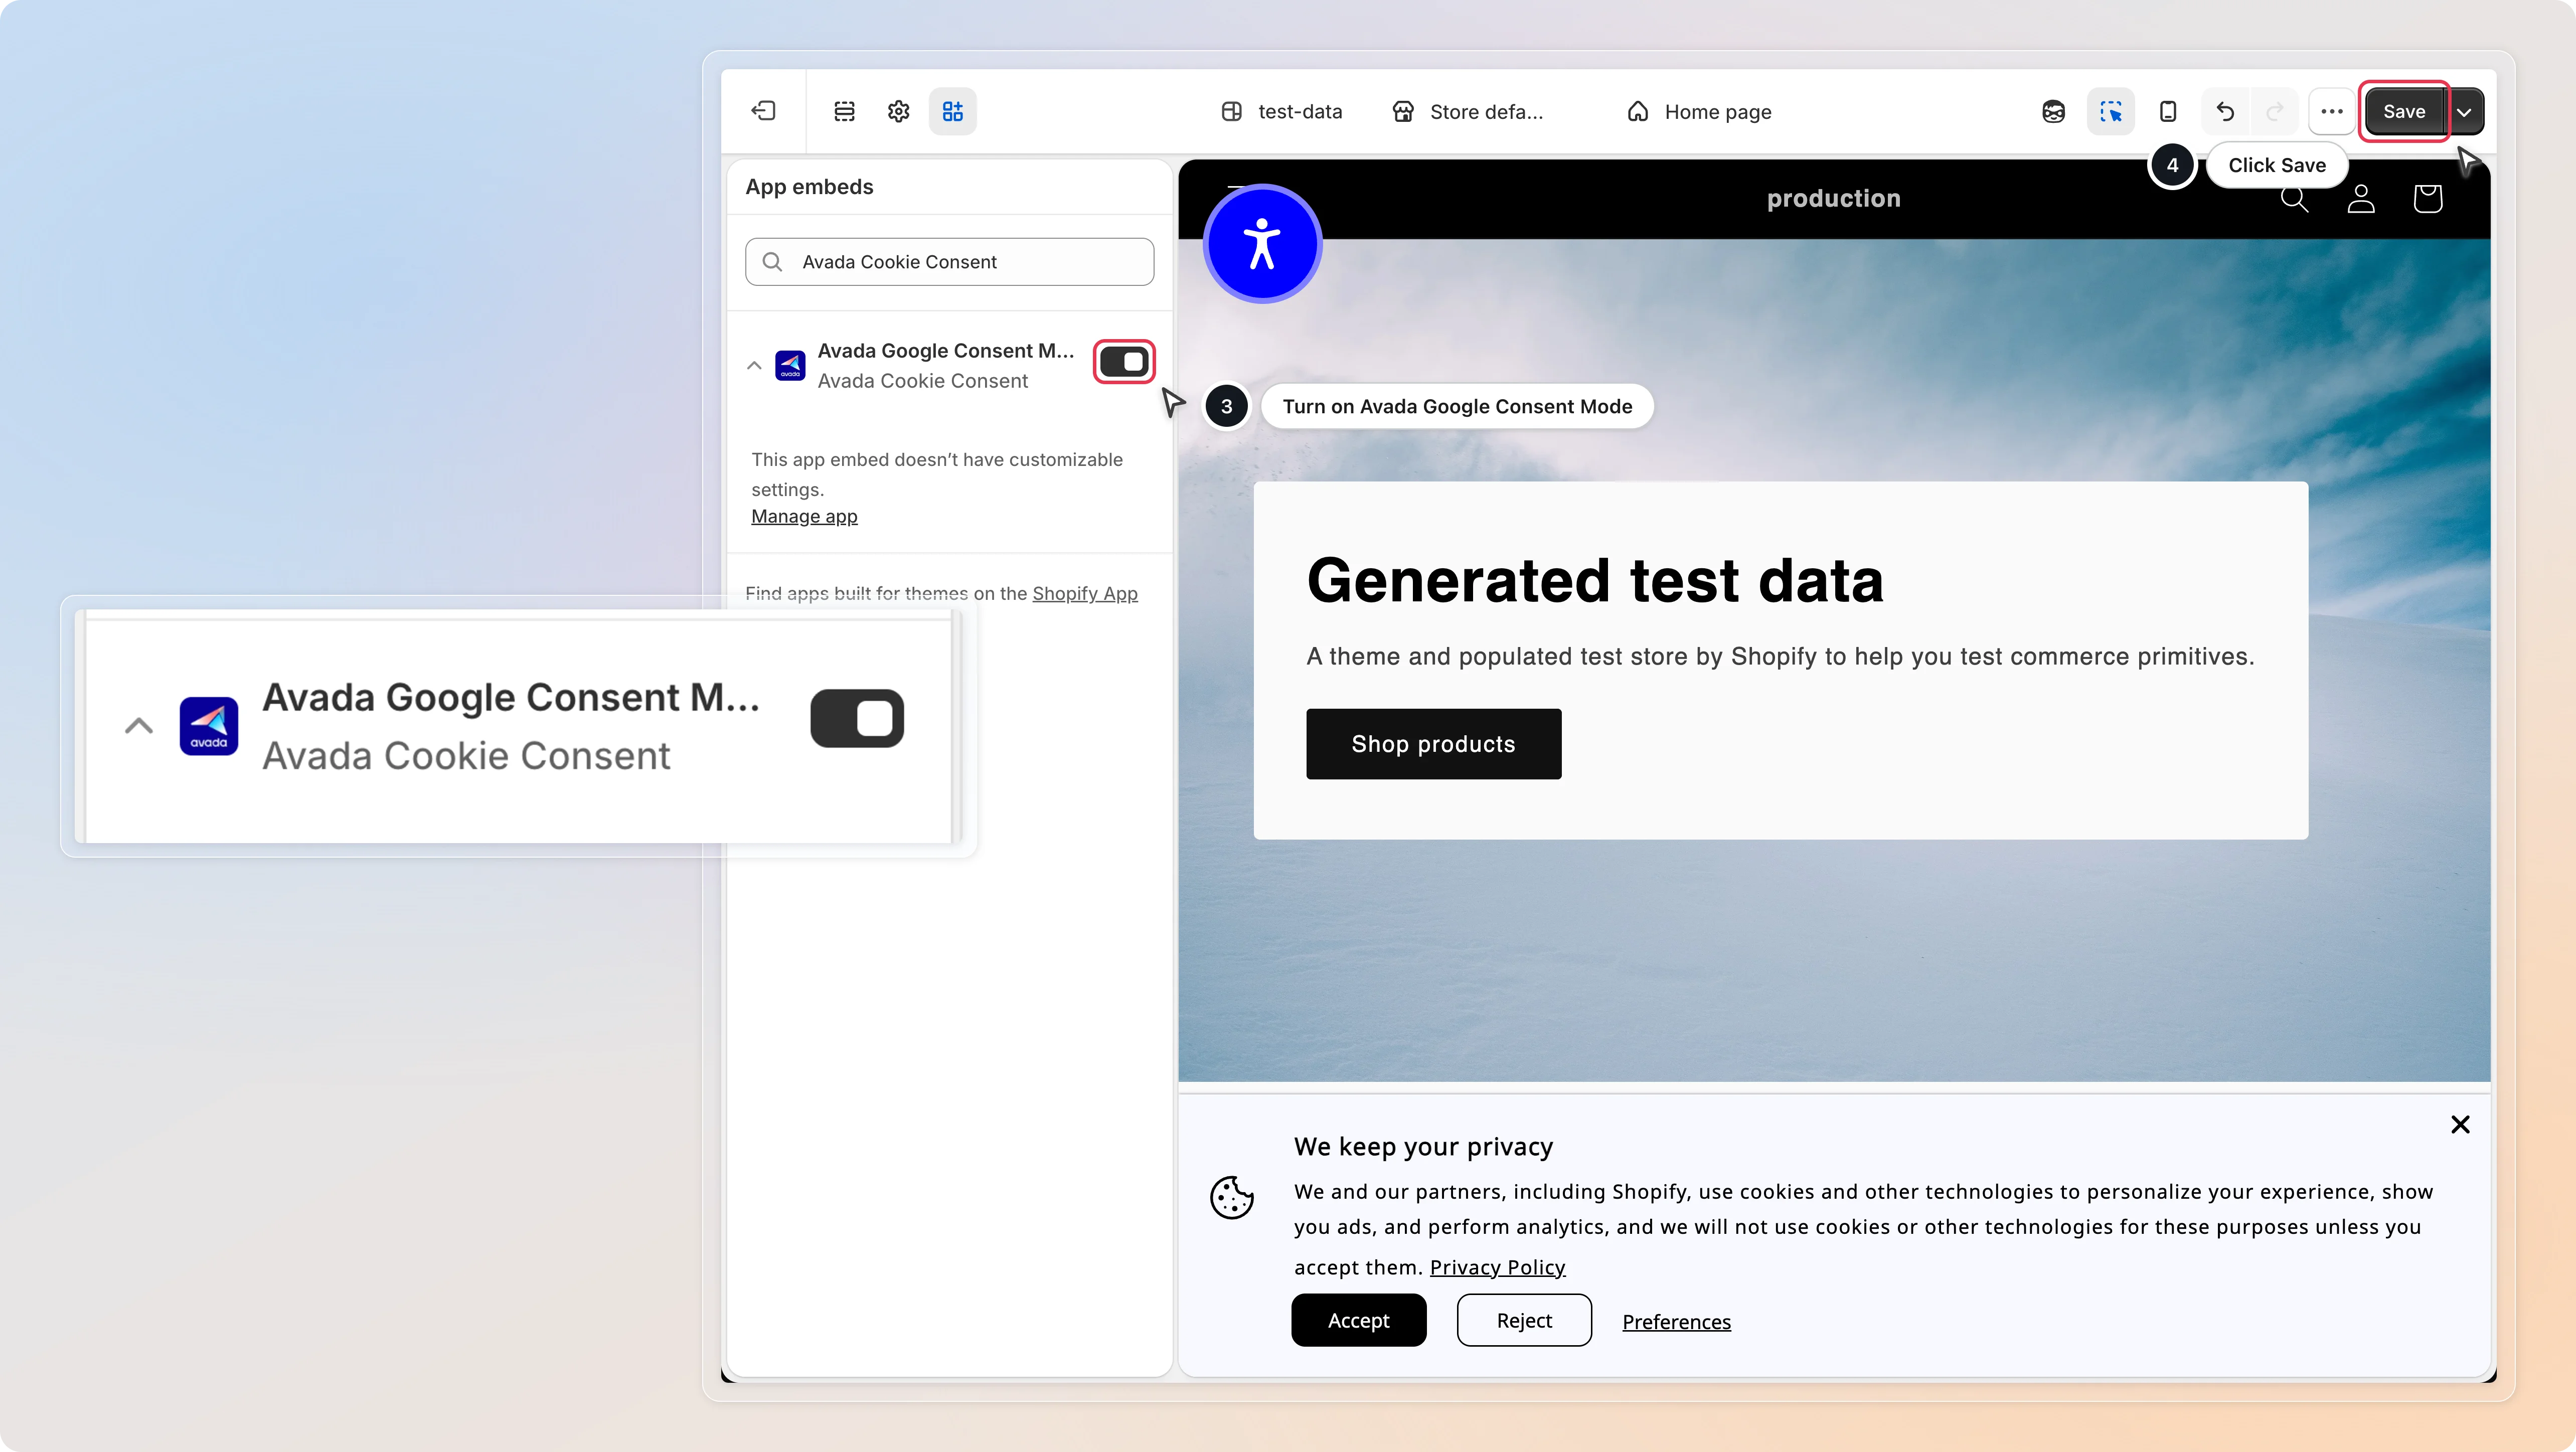
You can also open it yourself: go to Shopify Admin > Online Store > Themes > Customize, click the App embeds icon in the left sidebar, and turn on Avada Google Consent Mode.
Go back to the Google Consent Mode V2 page in the app and refresh it. The blue banner disappears and Step 1 to Step 3 appear.
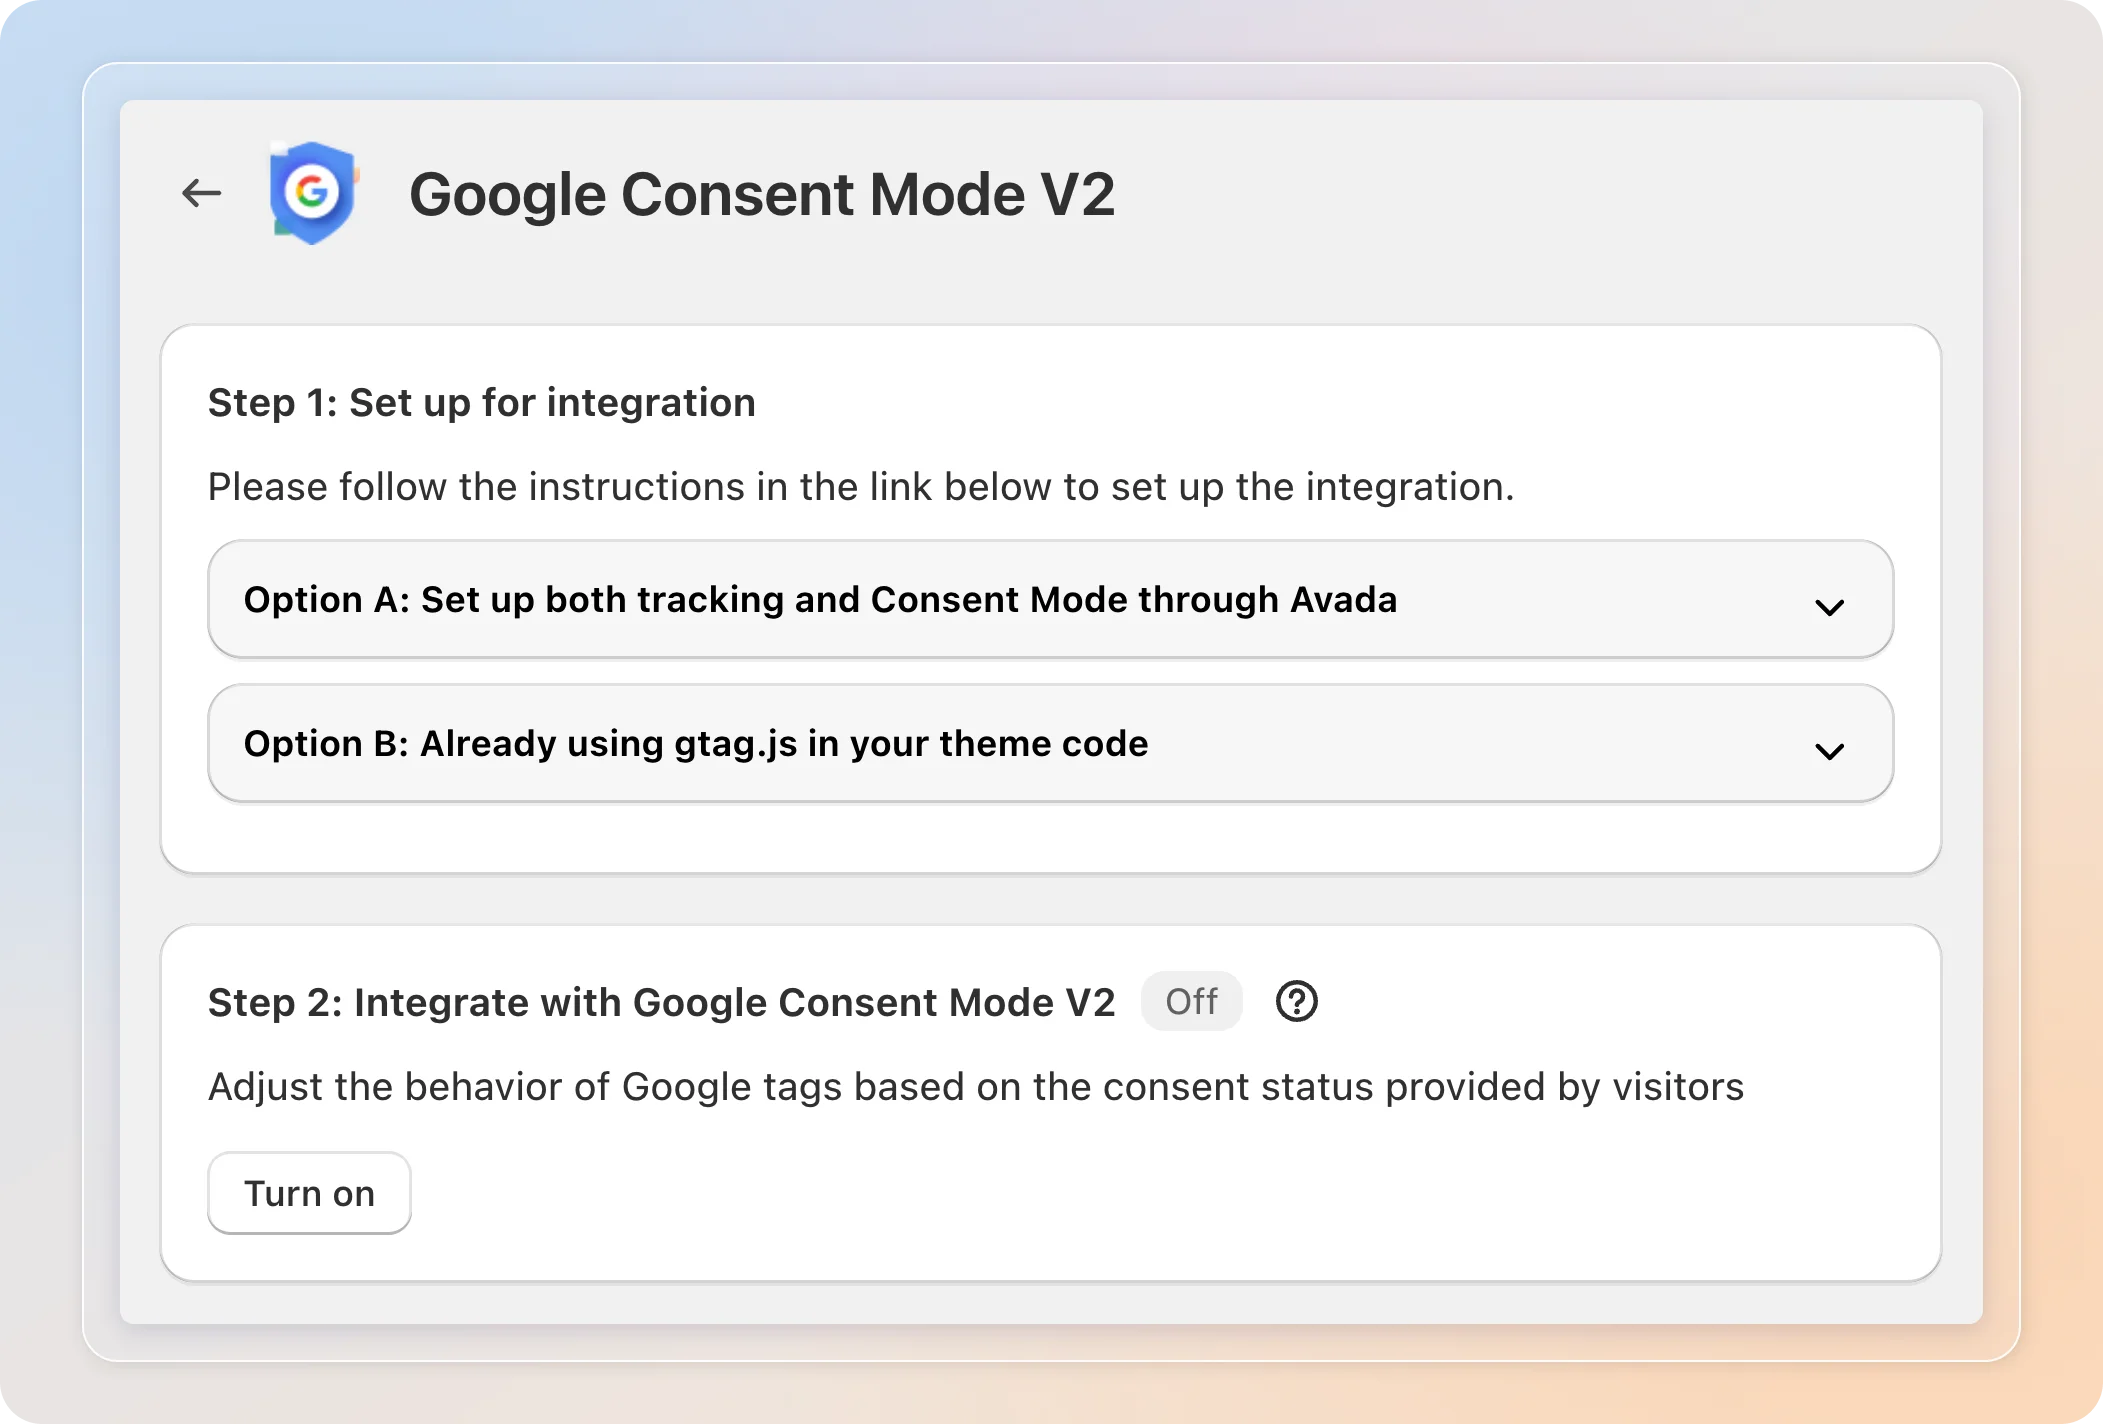
Turning on the app embed alone does not finish the setup. Continue with the steps below to connect your Google tags, turn on the integration, and test it.
Choose how your Google tags are loaded
In Step 1: Set up for integration, pick the option that matches how Google tags are installed on your store.
| Your situation | Use |
|---|---|
| You have not installed Google tags yet, or you are happy to let Avada load them | Option A |
Google tag (gtag.js) or Google Tag Manager is already added to your theme.liquid | Option B |
| Google tags come from another app or sales channel and you want to keep it that way | Option B |
Option A: Set up both tracking and Consent Mode through Avada
Enter your IDs and Avada loads your Google tags for you. No theme code is needed.
- Click Option A: Set up both tracking and Consent Mode through Avada to expand it.
- Enter the IDs you use. Separate several IDs of the same type with commas.
- Google Analytics ID (GA4), for example
G-XXXXXXXXXX - Google Ads ID (AW), for example
AW-XXXXXXXXX - Google Tag Manager ID (GTM), for example
GTM-XXXXXXX
- Google Analytics ID (GA4), for example
- Click Save in the bar at the top of the page.
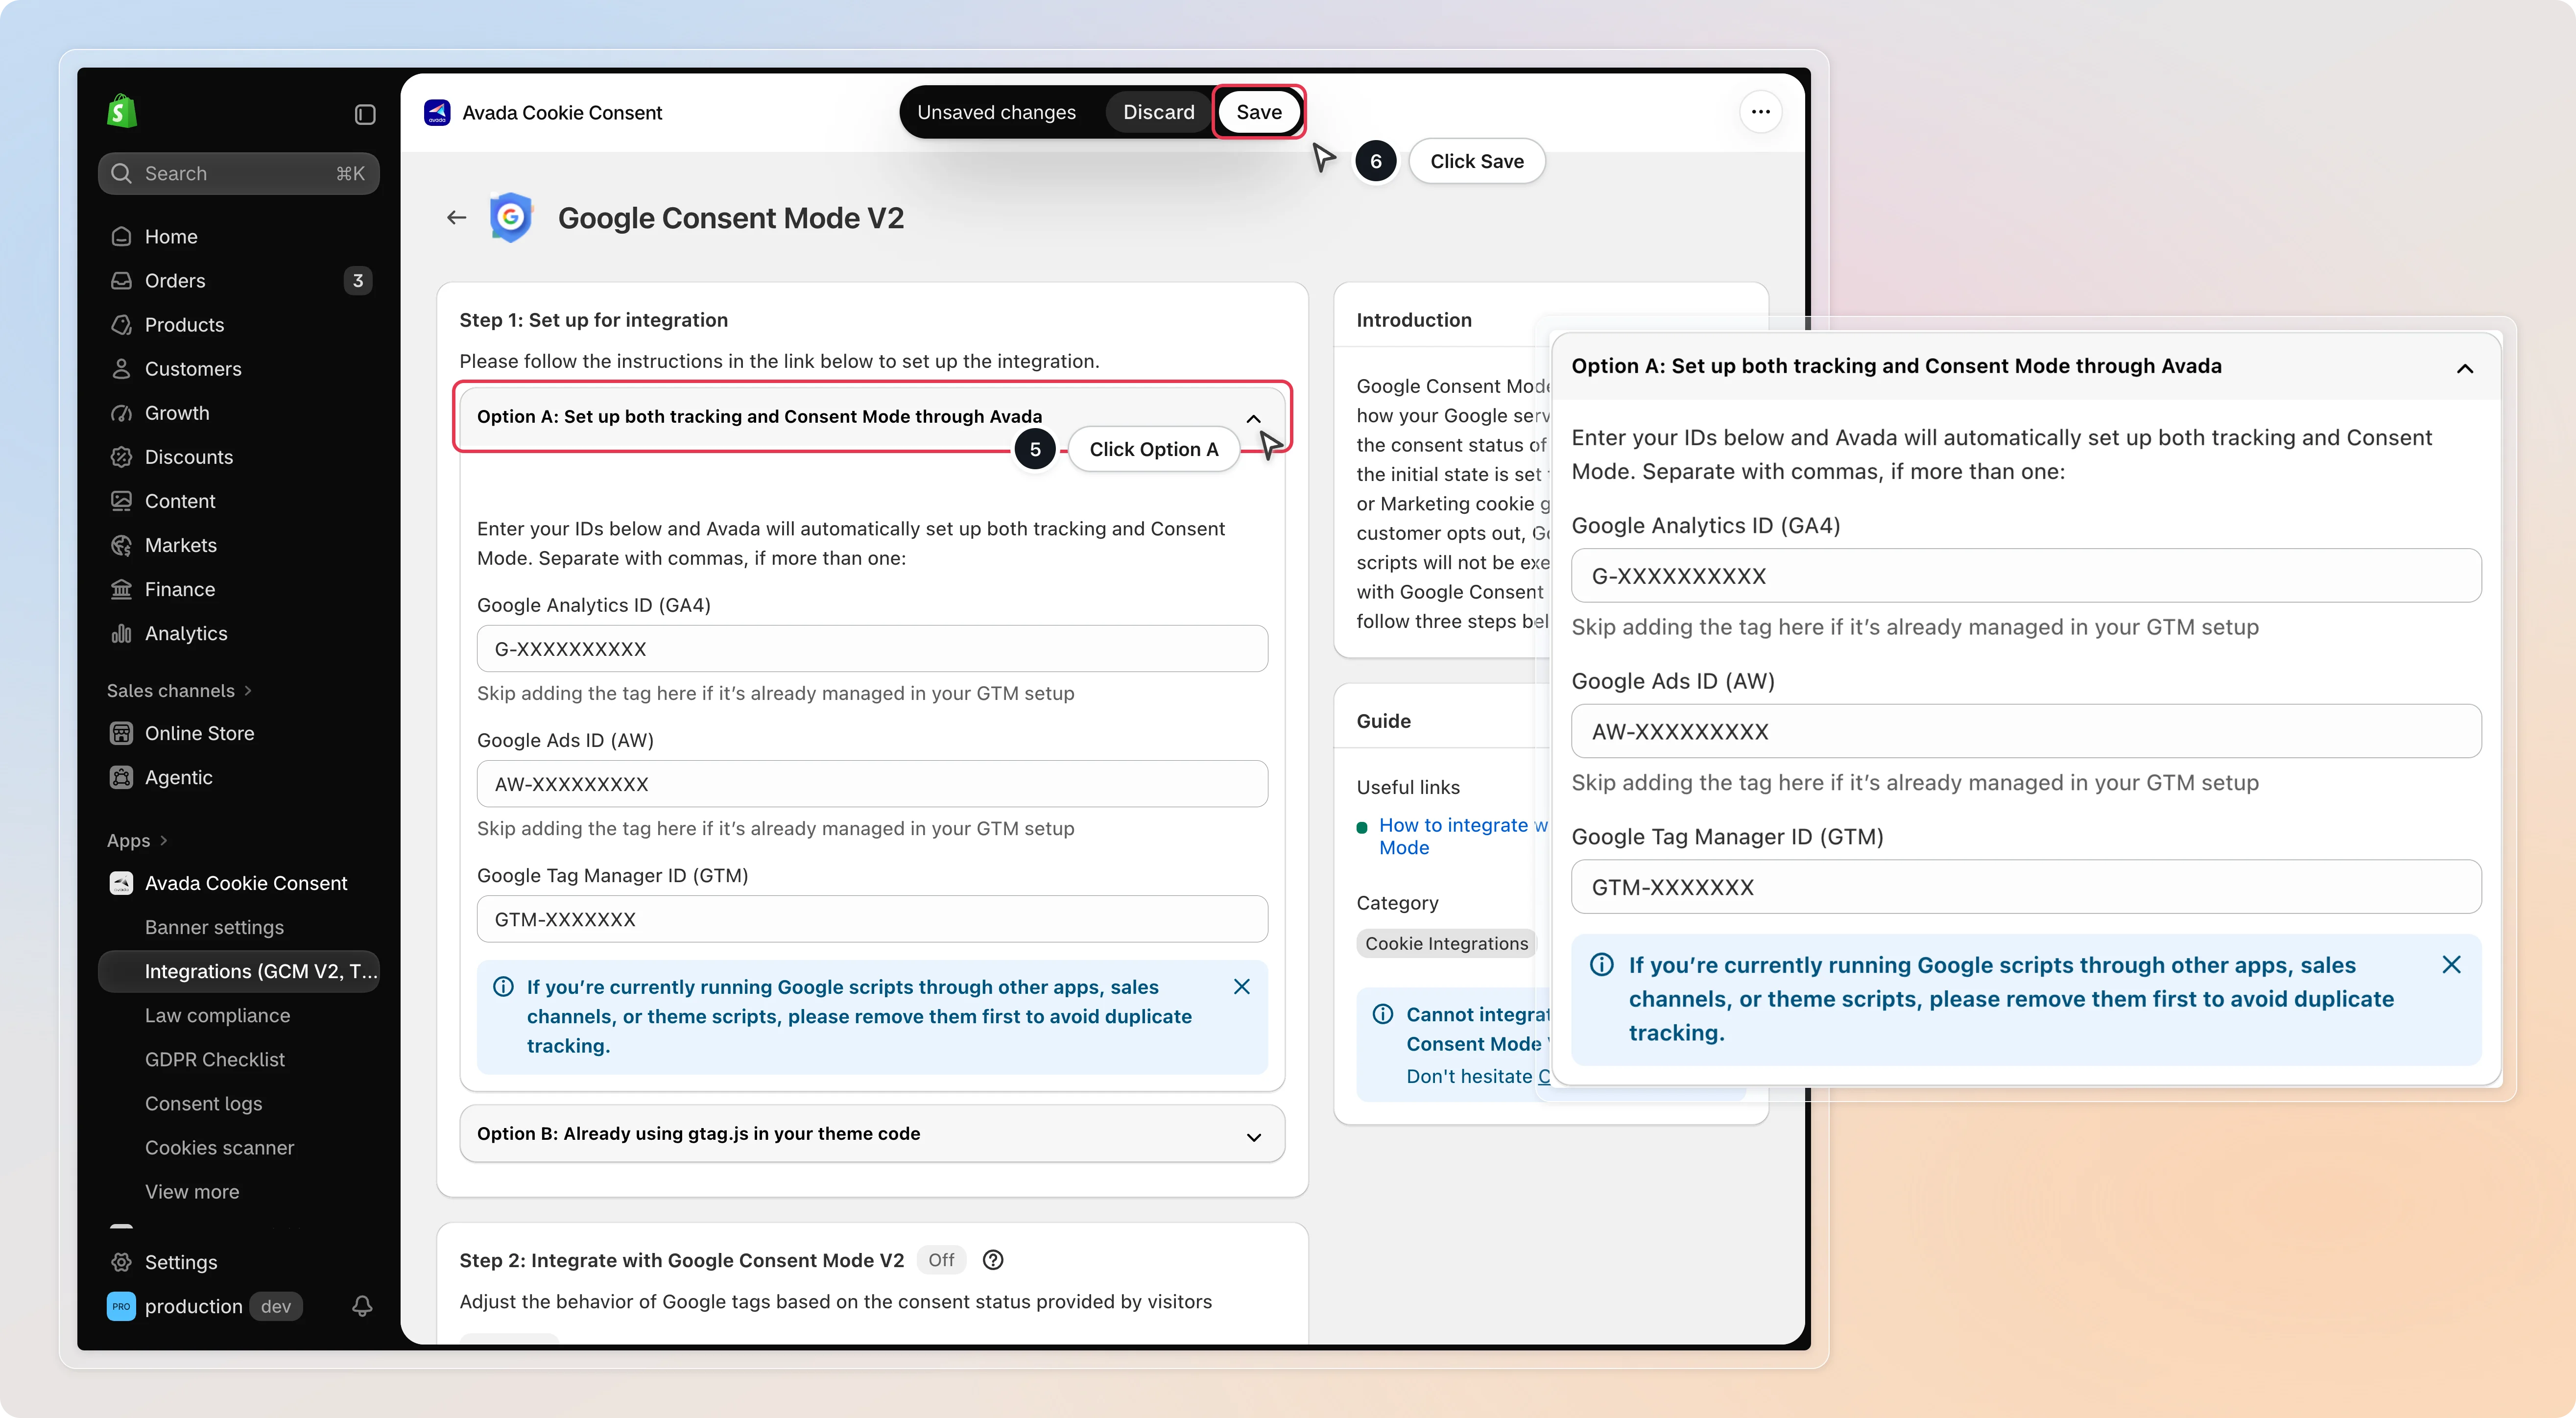
Remove any Google scripts that already run through other apps, sales channels, or your theme code before you use Option A. Otherwise your store sends the same data twice. If your GA4 or Google Ads tag is already managed inside your GTM container, enter only the GTM ID.
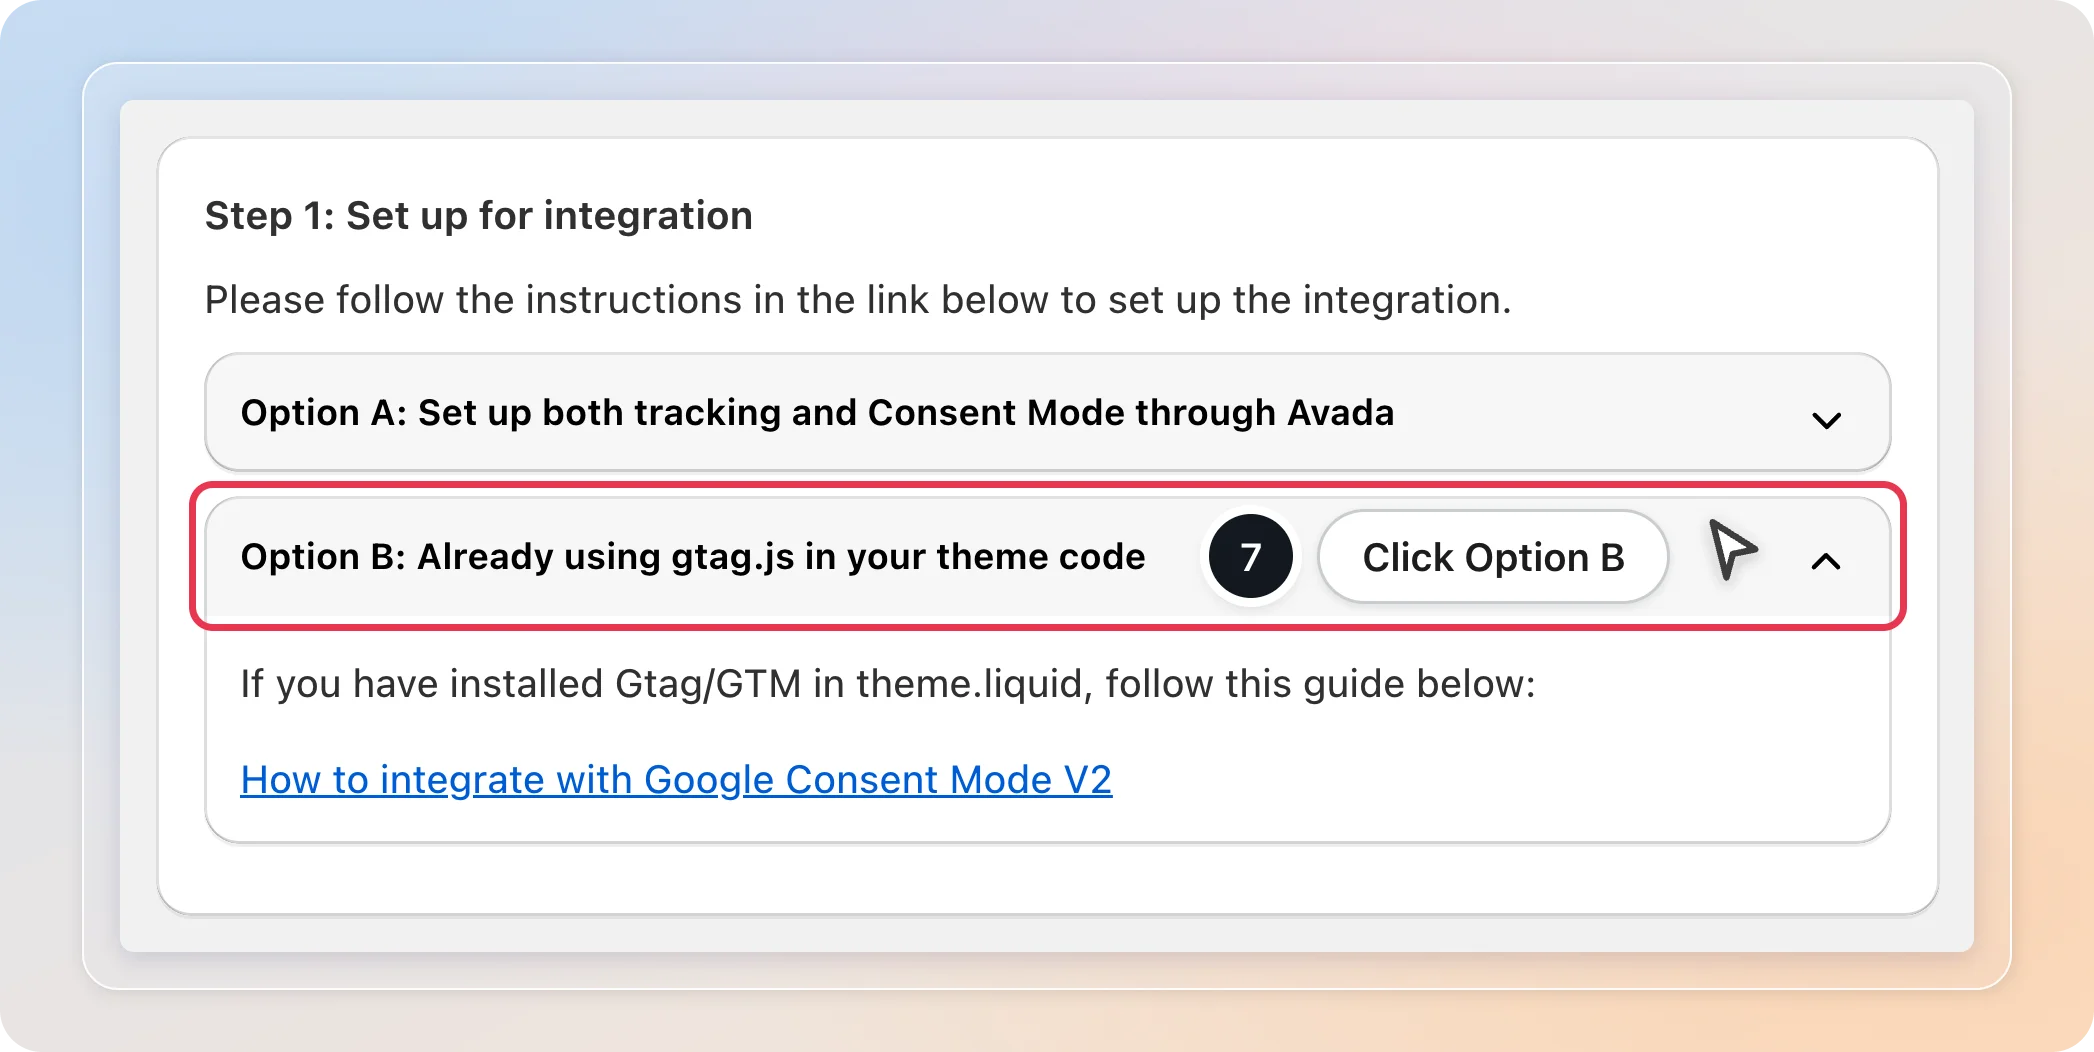
Option B: Already using gtag.js in your theme code
Keep your Google tag or GTM snippet where it is. You do not need to add any file or code to your theme. The Avada Google Consent Mode app embed you turned on in the previous step sets the default consent state before your Google tags load.
Turn on Google Consent Mode V2
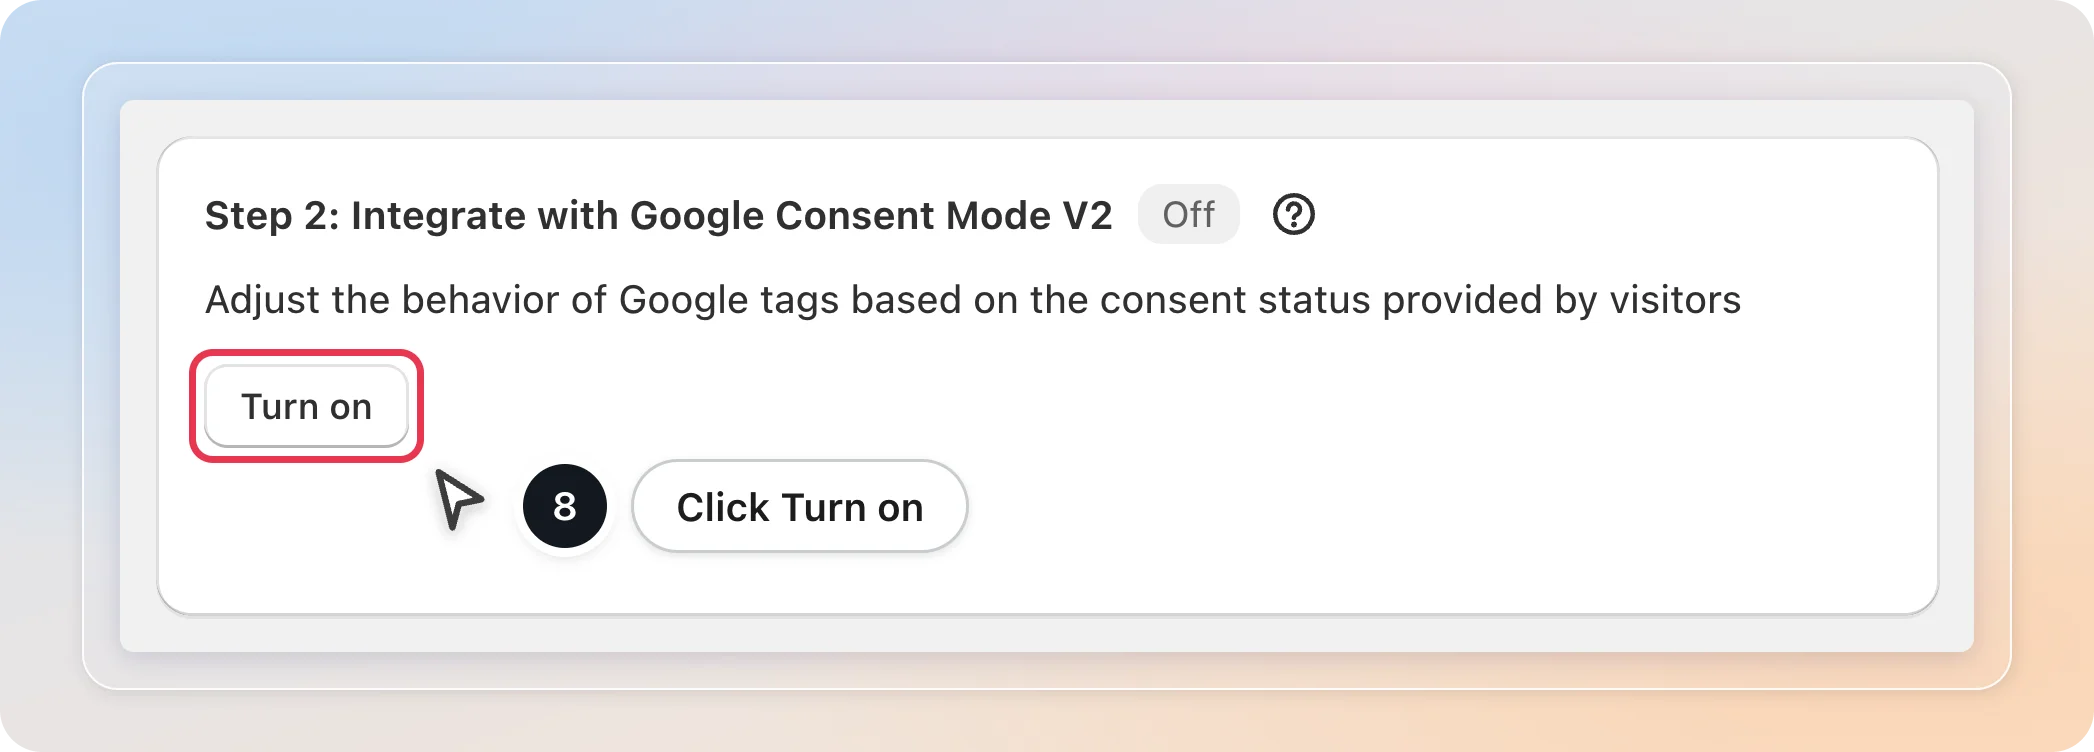
In Step 2: Integrate with Google Consent Mode V2, click Turn on. The status changes to On.
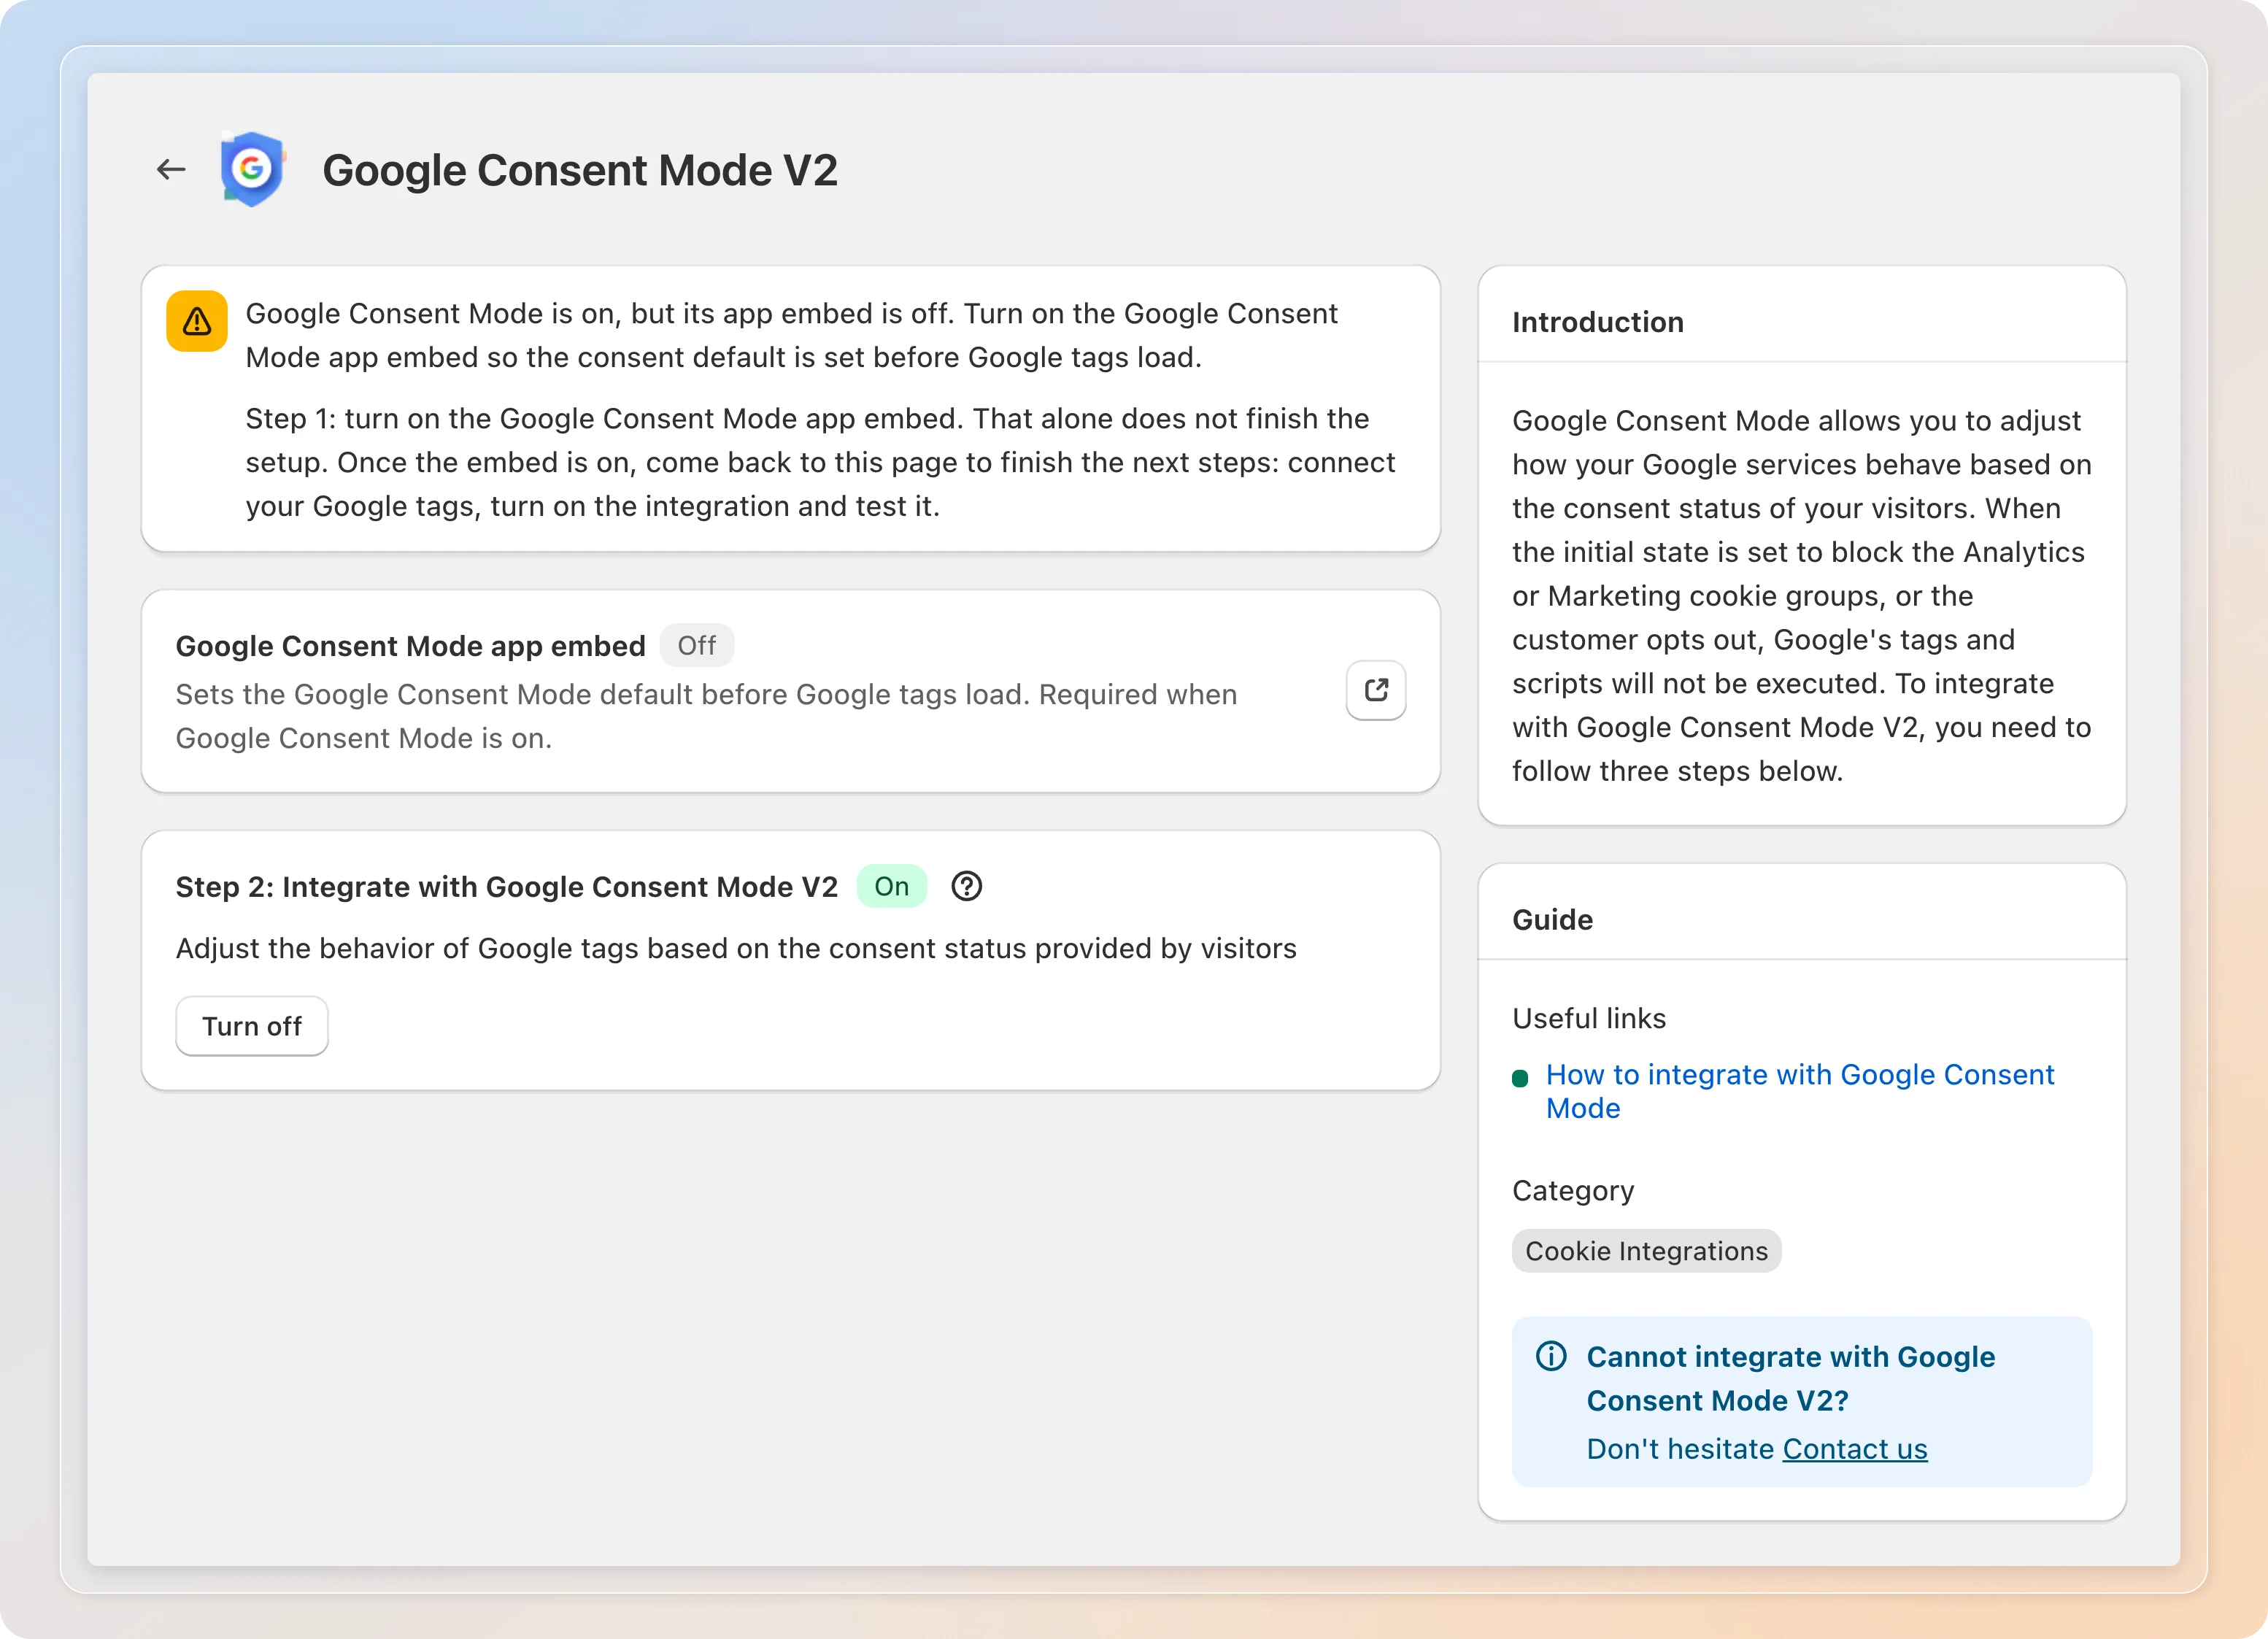
If Google Consent Mode V2 is on but the app embed is off, the page shows a warning: "Google Consent Mode is on, but its app embed is off." Turn the Avada Google Consent Mode app embed back on to fix it.
Test the integration
In Step 3, click View guide to follow the step-by-step test in the app. In short:
- Open your storefront and check the consent values in the browser console.
- Accept the cookie banner.
- Check that the values change to
granted.
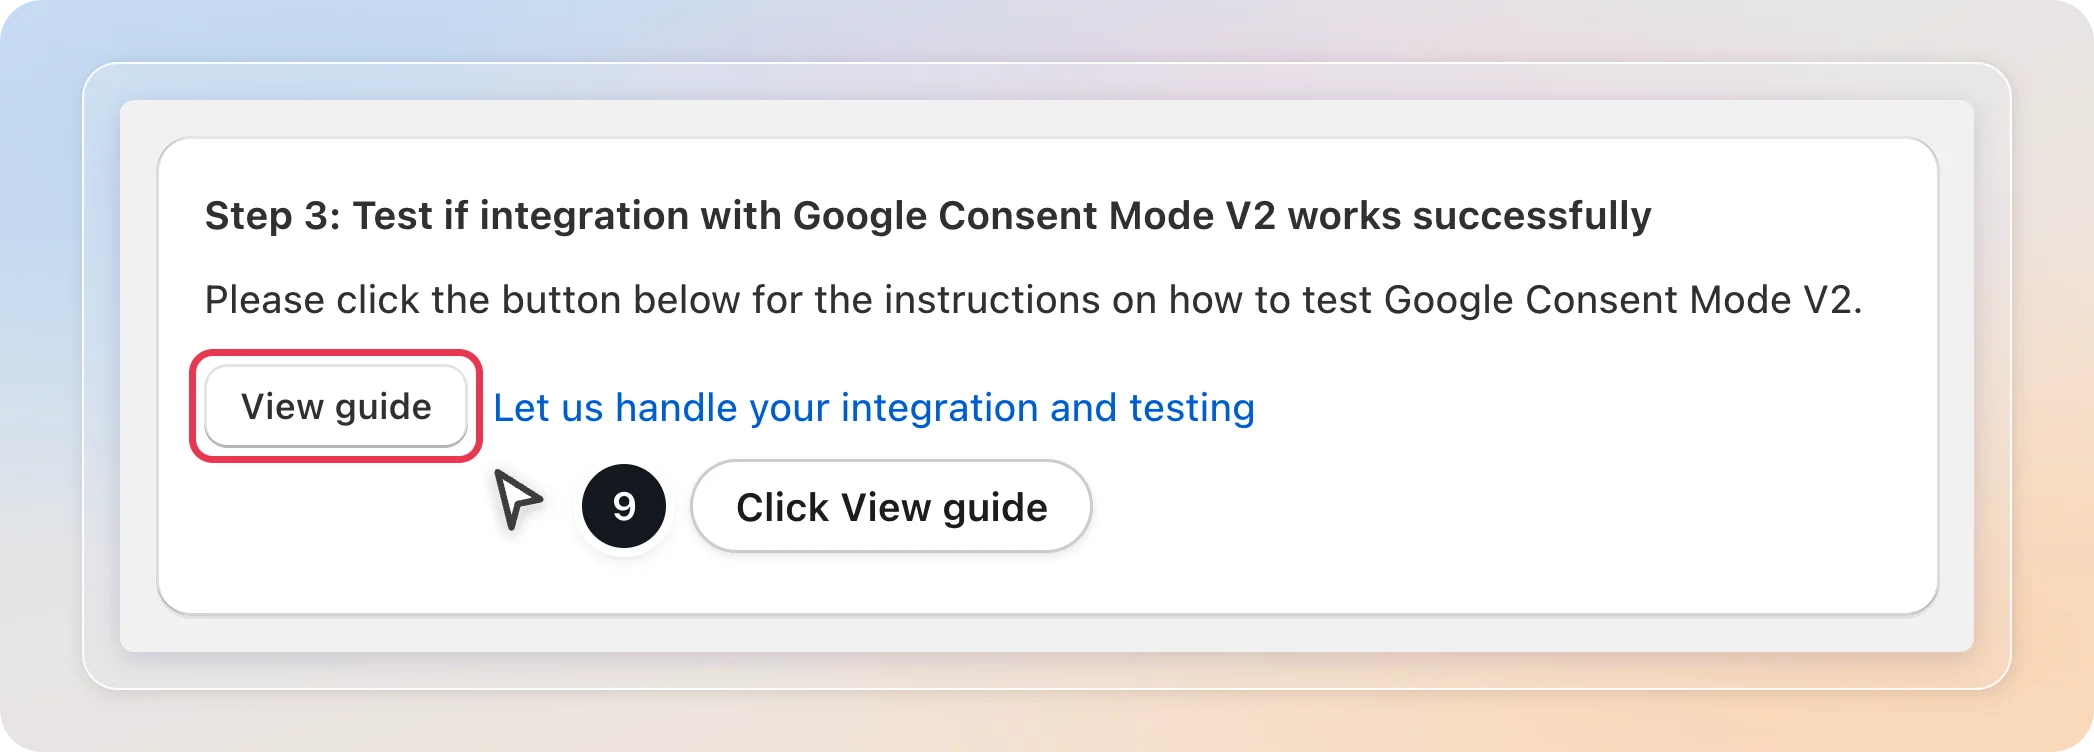
If you prefer, click Let us handle your integration and testing and our support team will set it up and test it for you.
How consent signals map to Google
Once turned on, Avada passes each visitor's choice to Google as consent signals.
| Cookie category | Google consent signals |
|---|---|
| Marketing | ad_storage, ad_user_data, ad_personalization |
| Analytics | analytics_storage |
| Functional | functionality_storage, personalization_storage |
| Always on | security_storage (always granted) |
Already set up with the old integration file?
Earlier versions of this guide asked you to upload avada-cookiebar-gcm-integration.js to your theme and add a script tag to theme.liquid. That setup still works, but use only one method, never both:
- Recommended: turn on the Avada Google Consent Mode app embed as shown above, then remove the old script tag from
theme.liquidand delete the file from your assets folder. - Keep the old file: if you prefer to stay on the old setup, leave the app embed off.
Running the app embed and the old integration file at the same time means two scripts set Google's default consent. Pick one. We recommend the app embed: it needs no theme code and updates automatically with the app.
If you still have the old file and script tag when you uninstall Avada Cookie Consent, remove them first. The app embed itself is removed automatically when you uninstall the app.
Tips
- Check the Google Consent Mode app embed status on the app Home page or in Settings > App embed. It should say On.
- The Google Consent Mode V2 item in the GDPR Checklist only counts as done when both the integration and the app embed are on.
- Changed your theme? Turn on the Avada Google Consent Mode app embed again on the new live theme.
Related Articles
- Google Consent Management Requirements
- Integrate with Microsoft Consent Mode (UET)
- IAB TCF v2.4 Compliance
And there you have it! You've successfully set up Google Consent Mode V2 with Avada Cookie Consent. Your Google tags now respect each visitor's consent choice from the first page load.
If you have any questions or run into any issues, don't hesitate to reach out. We're here to help!
Last updated October 16, 2026